Start off reading about how to Video Brainstorm to generate ideas and watch the examples provided in the Video Prototyping card. Before getting started with your own prototype, read through all of the cards to collect all design resources needed.
Preparation
Video Brainstorming
Create video sequences that illustrate an idea of how users would interact with a new design.
More
Video Brainstorming
Introduction
Video brainstorming extends standard brainstorming, so that participants not only write or draw their ideas, they act them out in front of a video camera. The goal is to simulate a wide variety of ideas very quickly and capture them in a way that is easier to understand (and remember) than hand-written text notes. In general, raw notes from brainstorming sessions tend not to be very useful after a few weeks because the participants no longer remember the context in which the ideas were created. Although video brainstorming generates fewer ideas in the same amount of time, each idea is easier to understand and recall. Video brainstorming is particularly appropriate when the goal is to create ideas for how users will interact with the new system and is especially appropriate at later stages of project design. Video brainstorming requires thinking more deeply about each idea. One can stay abstract when describing an interaction in words or even with a sketch, but acting out the interaction in front of the camera forces the author of the idea (and the other participants) to seriously consider how a user would interact with the idea. It also encourages designers and users to think about new ideas in the context in which they will be used. Video clips from a video brainstorming session, even though rough, are much easier for a programmer to interpret than ideas from a standard brainstorming session. See Mackay et al. (2000) for a more complete description of how video brainstorming works and how it can influence the design process.
To Do
Video brainstorming sessions require more preparation and resources than regular brainstorming. As in other forms of brainstorming, it is important to set a time limit. We usually limit sessions to one or at most two hours. Even beginners should be able to shoot two ideas per person. If you have a large group, break into smaller groups of 3-4 people. Gather a set of supplies for each group that participants use to mock up their ideas. The simplest is to use paper prototyping supplies: colored paper, post-it notes, pens, transparencies, scissors and tape, plus any other office supplies that seem relevant.
Each group should have its own video device: cameras with tripods are best, but phones and tablets work as well. Some tripods can attach the camera to shoot downward, towards the table, which is particularly useful if you plan to shoot users interacting with simulated computer screens.
Before shooting, prepare a titlecard with three columns: take number, author, and idea description. Each idea will be captured as a separate “take”. If you decide to explore several variations of the same idea, each variation is considered a new take. Whoever is the currently in the role of scribe is responsible for noting the corresponding information on the master sheet. The first scribe should prepare a title card (hand-written on colored paper or on a whiteboard) with the name of the brainstorming session, the date and any other relevant information. Set up the camera on the tripod and shoot at the brainstorming title card before recording the each idea. It helps to run a standard brainstorming session, either oral or with cards, prior to each video brainstorming session, to maximize the number of ideas to be explored. Participants take choose favorite ideas and develop them further or generate new ideas.
Each team member should direct two ideas, incorporating the hands or voices of other members of the group. The author of the idea takes on the role of director. After explaining the idea to the group, he or she can ask other group members to help illustrate the idea for the camera. Avoid arguments: this is the director's idea. Team member who disagree should shoot their own variation to illustrate their alternative. Choose a camera person and a scribe. The camera person simply operates the camera––the director chooses the camera angle and timing. The scribe prepares the title card for the take, by writing the director's name, a 3-5 word summary of the idea, and the take number. It's best to have a supply of different colored paper for making title cards, so that it's easy to distinguish the different takes on the video tape. The camera person shoots 5 seconds of the title card, then pauses the camera. The director then gives everyone a chance to practice the interaction once or twice and then videotapes it. Do not try to edit in the camera, by rewinding the tape and reshooting the idea if you make a mistake. Simply shoot the title card again (modified to say "Take 3 b") and reshoot the scene. Remember, you want to capture as many ideas as possible. Everyone shifts roles for each new idea, with a new director, camera person and scribe. Ideas often become explorations of a "theme and variations". One person tapes a particular idea, and others create different interpretations or extensions of the idea in subsequent "takes". Some people work systematically through a set of ideas, others seek maximally diverse ideas, to show the limits of the design space. Choose the director, who chooses the first idea and assigns the remaining roles.
(Everyone will perform each role, over a series of ideas.) Create the materials necessary to illustrate the idea, rehearse once, video the titlecard and then video the interaction. You can use a voice over,
but it is usually best to illustrate the idea through the action.
At the end of the session, you should have a list of ideas and a corresponding set of video ideas, each with a titlecard that identifies the director and describes the idea, followed by a short clip that illustrates new interaction design possibilities.

Video Prototyping
Video Prototypes tell a story how user/s interact with a system through a series of interaction points. Designers can use them as a resource to sketch and explore design options with users and designers. A Video Prototype includes breakdowns and shows the context the system is placed in.
More
Video Prototyping
Introduction
Video prototypes (Mackay, 1988) use video to illustrate how users will interact with a new system. The goal is to refine a single system concept, making design choices that highlight and explore a particular design path. The technique appears similar to video brainstorming: Both involve small design groups who work together to create and interact with rapid prototypes in front of a video camera. Both result in video illustrations that render abstract ideas concrete and help team members communicate with each other. Both use paper & pencil prototypes or cardboard mock-ups to simulate novel technology. The critical difference is that video brainstorming expands the design space, by creating a number of unconnected collections of individual ideas, whereas video prototyping contracts the design space, by showing how a specific collection of design choices work together in a single design proposal.
Video prototypes are organized as scenarios that illustrate how people might interact with a future technology in a realistic setting. Video prototypes may also incorporate any of a variety of off-line or computer-based prototyping techniques. However, the focus should be on helping designers to consider the details of how users will react to and control new technology in the context in which it will be used.
Video prototypes should be thought of as sketches that illustrate what the interaction with the new system will be like in a real-world setting. They should be quick, easy and inexpensive to create and are invaluable for communicating with design team members, users and outside stakeholders.
To Do
Video prototypes build upon a number of design resources created in earlier design exercises. The use scenario acts as the foundation, telling a specific, realistic story about how real people would interact with it in a realistic setting. The characters in the video prototype are represented as personas or extreme characters drawn from interviews and observations, placed are in a particular situation at a particular place and time. The scenario describes relevant motivations and their activities over time, organized into a series of ‘interaction points’ or incidents in which the users come in contact with the new system. The next step is to create a design scenario, which reassesses the use scenario and describes what would change if a new technology were introduced. The design scenario may illustrate how interaction with existing technology could be improved or suggest novel forms of interaction that address unmet needs or desires.
Once the design scenario is described in words, the designer develops a storybpard. Similar to a comic book, the storyboard shows a sequence of rough sketches of each action or event, with accompanying actions and/or dialog (or subtitles). Related annotations explain either what is happening in the scene or the type of shot, e.g., close-up or long shot. The storyboard is an important step between the design scenario and the video prototype, not only to guide how the interaction will be shot but also to encourage the designers to think more specifically about just how the interaction will work in context.
The "editing-in-the-camera" technique (Mackay, 2000) involves shooting each sequence of the video prototype in the order that it will be viewed, to avoid later editing on the computer. With a welldesigned storyboard, this is easy and results in a finished finished video prototype that can be viewed at the end of the session. Unfortunately, the advent of digital video has made this term confusing and made it more difficult to convince directors to avoid in-camera or computer-based editing. Please, try to avoid this: it wastes time. Although it is tempting to use the camera’s editing features to fix minor problems or to rearrange clips, it is much faster to simply follow the storyboard.
Be sure to use title cards, as in a silent movie, to separate video clips. This facilitates shooting, makes it easier for viewers to follow the story and simplifies handling shooting errors. If you make a mistake, simple reshoot the title card and the problematic sequence. You can view the result at the end of the session, or if you do edit on a computer, you simply delete the earlier sequence whenever a title card reappears. The goal is to create a finished artifact that everyone can view at the end of the session, rather than waiting for someone to spend time editing it. Editing always takes more time than expected and eliminates the quick, sketching quality of the video prototyping process.
Team members should actively participate in creating the mock ups of the technology. Everyone should also think about the interaction and how to illustrate it. Team members can play with lo-fi special effects, such as time-lapse photography. For example, record a user pressing a button. Next, pause or stop the camera (keeping it steady, ideally on a tripod or else braced against the camera person’s body) and insert a new dialog box. Restart the camera to create the illusion of immediate feedback, i.e. that the dialog box ‘popped up’ in response the user’s button press. Simulate a mouse cursor on a paper prototype by cutting a strip of a transparency and drawing an arrow at the end. Move the arrow to a post-it note menu item, pause the camera, show the result of the action with the arrow cursor in the same position on the ‘screen’. Simulate typing by pre-writing the text and then having it appear through a slit in the paper, or using the time-lapse technique to jump forward in time, with the completed text. With a little ingenuity, you can illustrate a wide variety of interaction techniques.

Title Cards
Title cards contain the title of a shown interaction, the idea and a brief description. Each title card represents one interaction point of the storyboard.
More
Title Cards
Introduction
Before shooting a video prototype, prepare a titlecard with three columns: take number,
author, and idea description. Each idea will be captured as a separate “take”. If you decide to explore several variations of the same idea, each variation is considered a new take. Whoever is the currently in the role of scribe is responsible for noting the corresponding information on the master sheet. The first scribe should prepare a title card (hand-written on colored paper or on a whiteboard) with the name of the brainstorming session, the date and any other relevant information. Set up the camera on the tripod and shoot at the brainstorming title card before recording the each idea. It helps to run a standard brainstorming session, either oral or with cards, prior to each video brainstorming session, to maximize the number of ideas to be explored. Participants take choose favorite ideas and develop them further or generate new ideas.

Interaction Points
An interaction point is the moment in which the user performs an action, the system responds, and
the user reacts. Look through your design resources and identify the most interesting interactions.
More
Interaction Points
Introduction
Interaction designers take advantage of number of design techniques from various disciplines that help us to learn about the user's perspective, each with advantages and disadvantages. The fastest, cheapest and easiest (but not the best!) is called introspection. Introspection is defined as the direct observation of one's own thought processes and is the opposite of extrospection, the observation of things external to one's self.
Careful! If you a researcher, introspection is not considered a valid scientific approach. However, it can be a valid design technique, as long as it provides useful insights and encourages you, as the designer, to go beyond a purely functional or architectural view of the system and begin to think about the user's experience. A word of warning, though, for computer scientists and engineers. Research has shown that they think about computer systems very differently than most other users. For a programmer, the computer is the focal point of his or her work, whereas for the 'ordinary user', the computer is
only a means to and end, that is, to accomplish other 'real' work. Regardless of your background, it is important to remember that analyzing your own use of a system that you have designed or built provides only a limited and sometimes misleading view of the system. You must also observe other users, to understand their perspectives. Try to find a balance between a very informal, high-level process and
an overly rigid, obsessively detailed one. The former will miss useful details and insights; the latter will waste time and produce unnecessary detail. The goal here is to stay open to surprises and capture them, including any breakdowns, bugs, or unexpected features (positive as well as negative) that lead to new insights about the current design and suggest possibilities for a future design.
To Do
Preparation (before)
Set aside a fixed period of time, 15-30 minutes, and ensure that you will not be disturbed. Choose a current, real task that you need to do anyway and decide in advance how you plan to record your thoughts. You may use a screen recording or record audio as you talk through your
actions. These will require later transcription but will provide the most detail about your actions and what you were trying to do at each point.
In addition, you should write notes (either electronically or on paper), alternating between doing the task and reflecting upon it. Focus on your interaction with the existing system: What did you do and how did the system respond? What was your subsequent reaction? Was it what you expected? Was it what you wanted? Did the system interrupt you? Did you understand the interruption? Did you want the interruption? Keep going, step by step, using the system and recording your reaction to it, until the time is up. At the end of the session, think about what you learned. Are there particular details that are annoying (or particularly useful)? What surprised you? What is your overall reaction to the system? Have you any particular ideas about things you'd like to improve?
Procedure (during)
When you are ready, ensure that you will not be disturbed. Set a timer and start the task, in this case, editing a text document. Stop after every step and note the details of your interaction. (Note: If you perform a series of the same steps several times, you can note the repeated sequence, without restating the details, if the interaction is the same. Be sure to note how many times you repeated the sequence.)
You can write your notes in paragraph form or use a table format where you enter each step on a new line. If you use the text format, highlight the key interaction points when you are done. For both formats, use a symbol to indicate surprising events.
Variations
Peer introspection:
Pairs of users (or designers) to work together and explain to each other what they are experiencing. The advantages of this technique are that shy users are much more likely to talk to another person than just talking out loud, will be able to see and perhaps compare differences in how two users experience the same event, and you will find out more about how users think as they try to explain how the system works to their colleagues. The disadvantage is that one user may overwhelm the other or that they may come to a single conclusion rather than provide two different perspectives. In this case, the roles are separated, so that one person is the performer and the other is the scribe.
A good introspection results in new insights about the details of the interaction between the user and the system. Ideally, you should be able to highlight and explore the surprises you discover with other designers or with users (to see if they experience similar problems or find similar solutions).
References
-
Flanagan, J.C. (1954) The critical incident technique. Psychological Bulletin, 51(4), 327-358. http://dx.doi.org/10.1037/h0061470.
-
The "Think-Aloud" protocol, introduced by Ericsson & Simon, is a second-level introspection technique. The user is asked explain out loud what they are experiencing as they try the software. This provides the designer or researcher with a much richer understanding of the details of what users are thinking as they work.
-
Lewis, C. H. (1982). Using the "Thinking Aloud" Method In Cognitive Interface
Design (Technical report). IBM. RC-9265. -
Ericsson, K., & Simon, H. (May 1980). "Verbal reports as data". Psychological
Review. 87 (3): 215–251. doi:10.1037/0033-295X.87.3.215.
Storyboard
A storyboard contains your design scenario as a series of interaction points. Intertitles describe what is happening in the story and sketches illustrate the user's interaction with the system.
More
Storyboard
Introduction
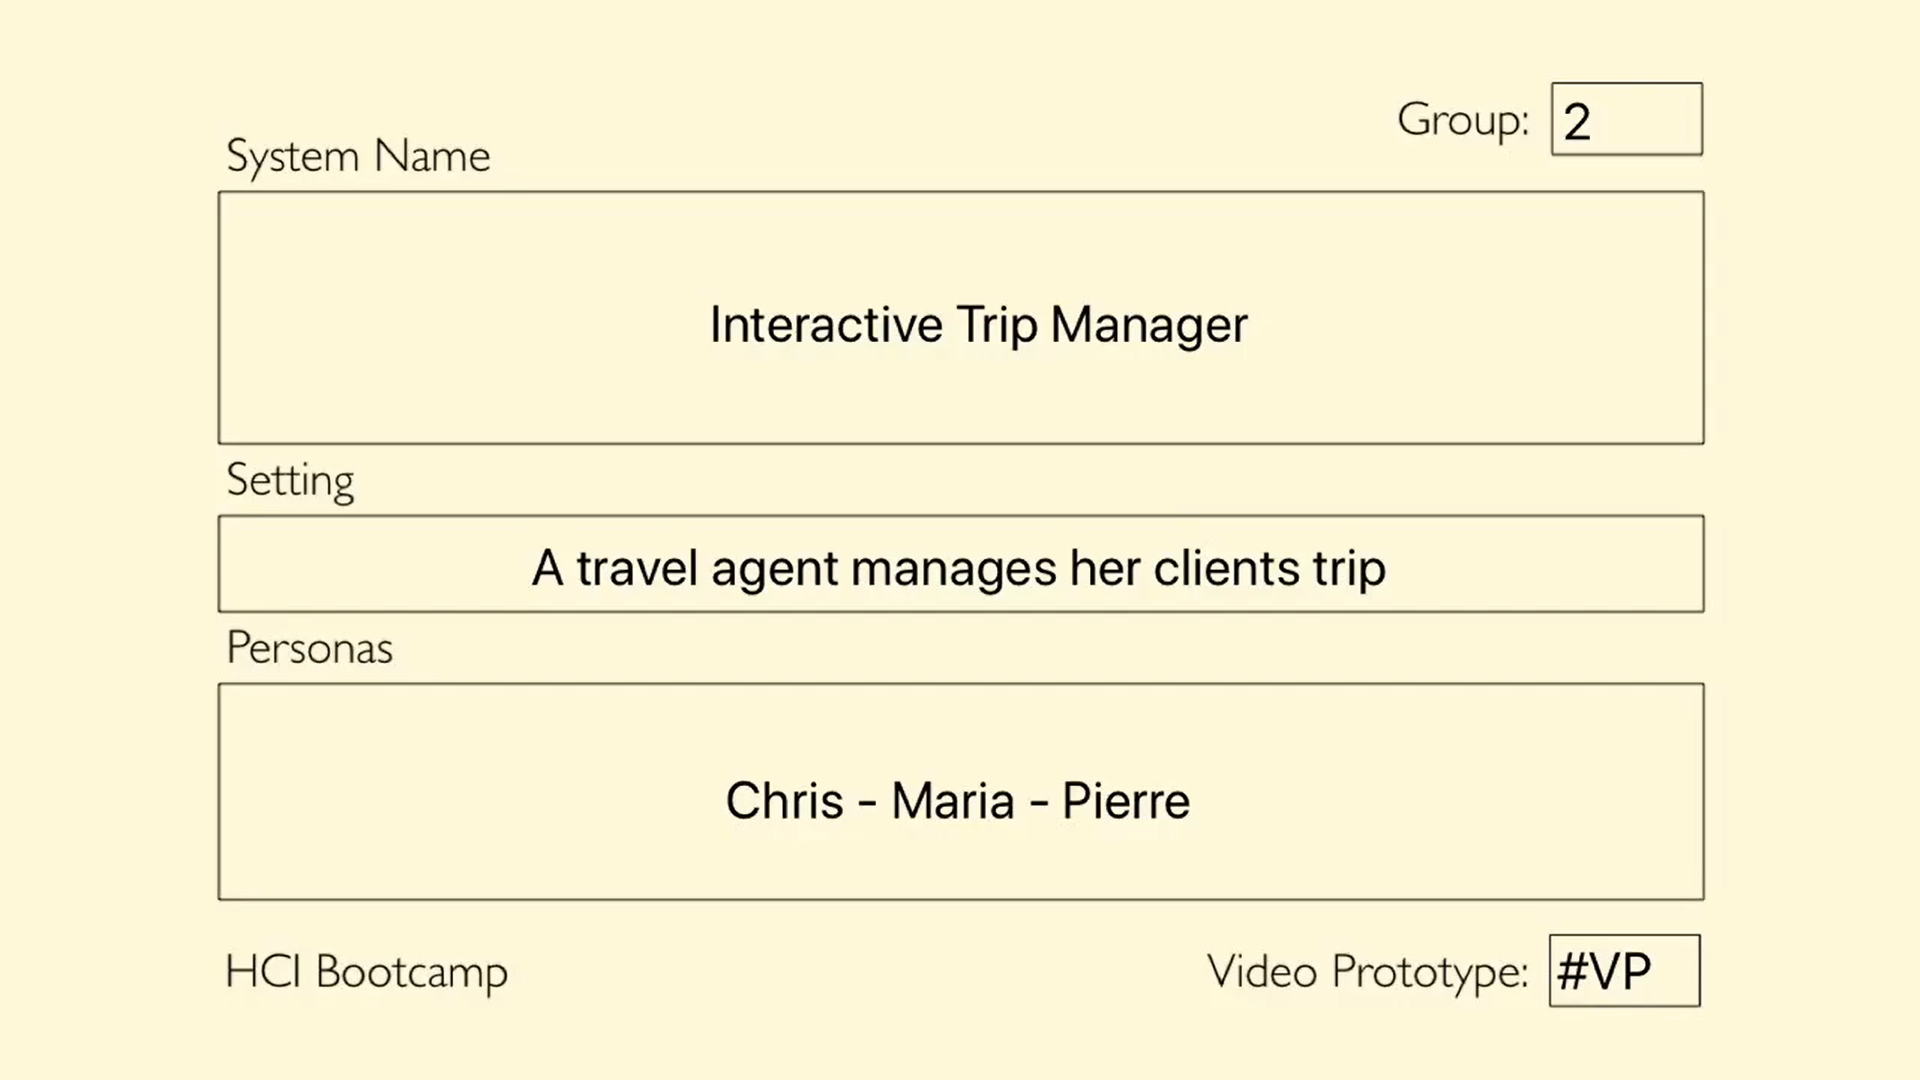
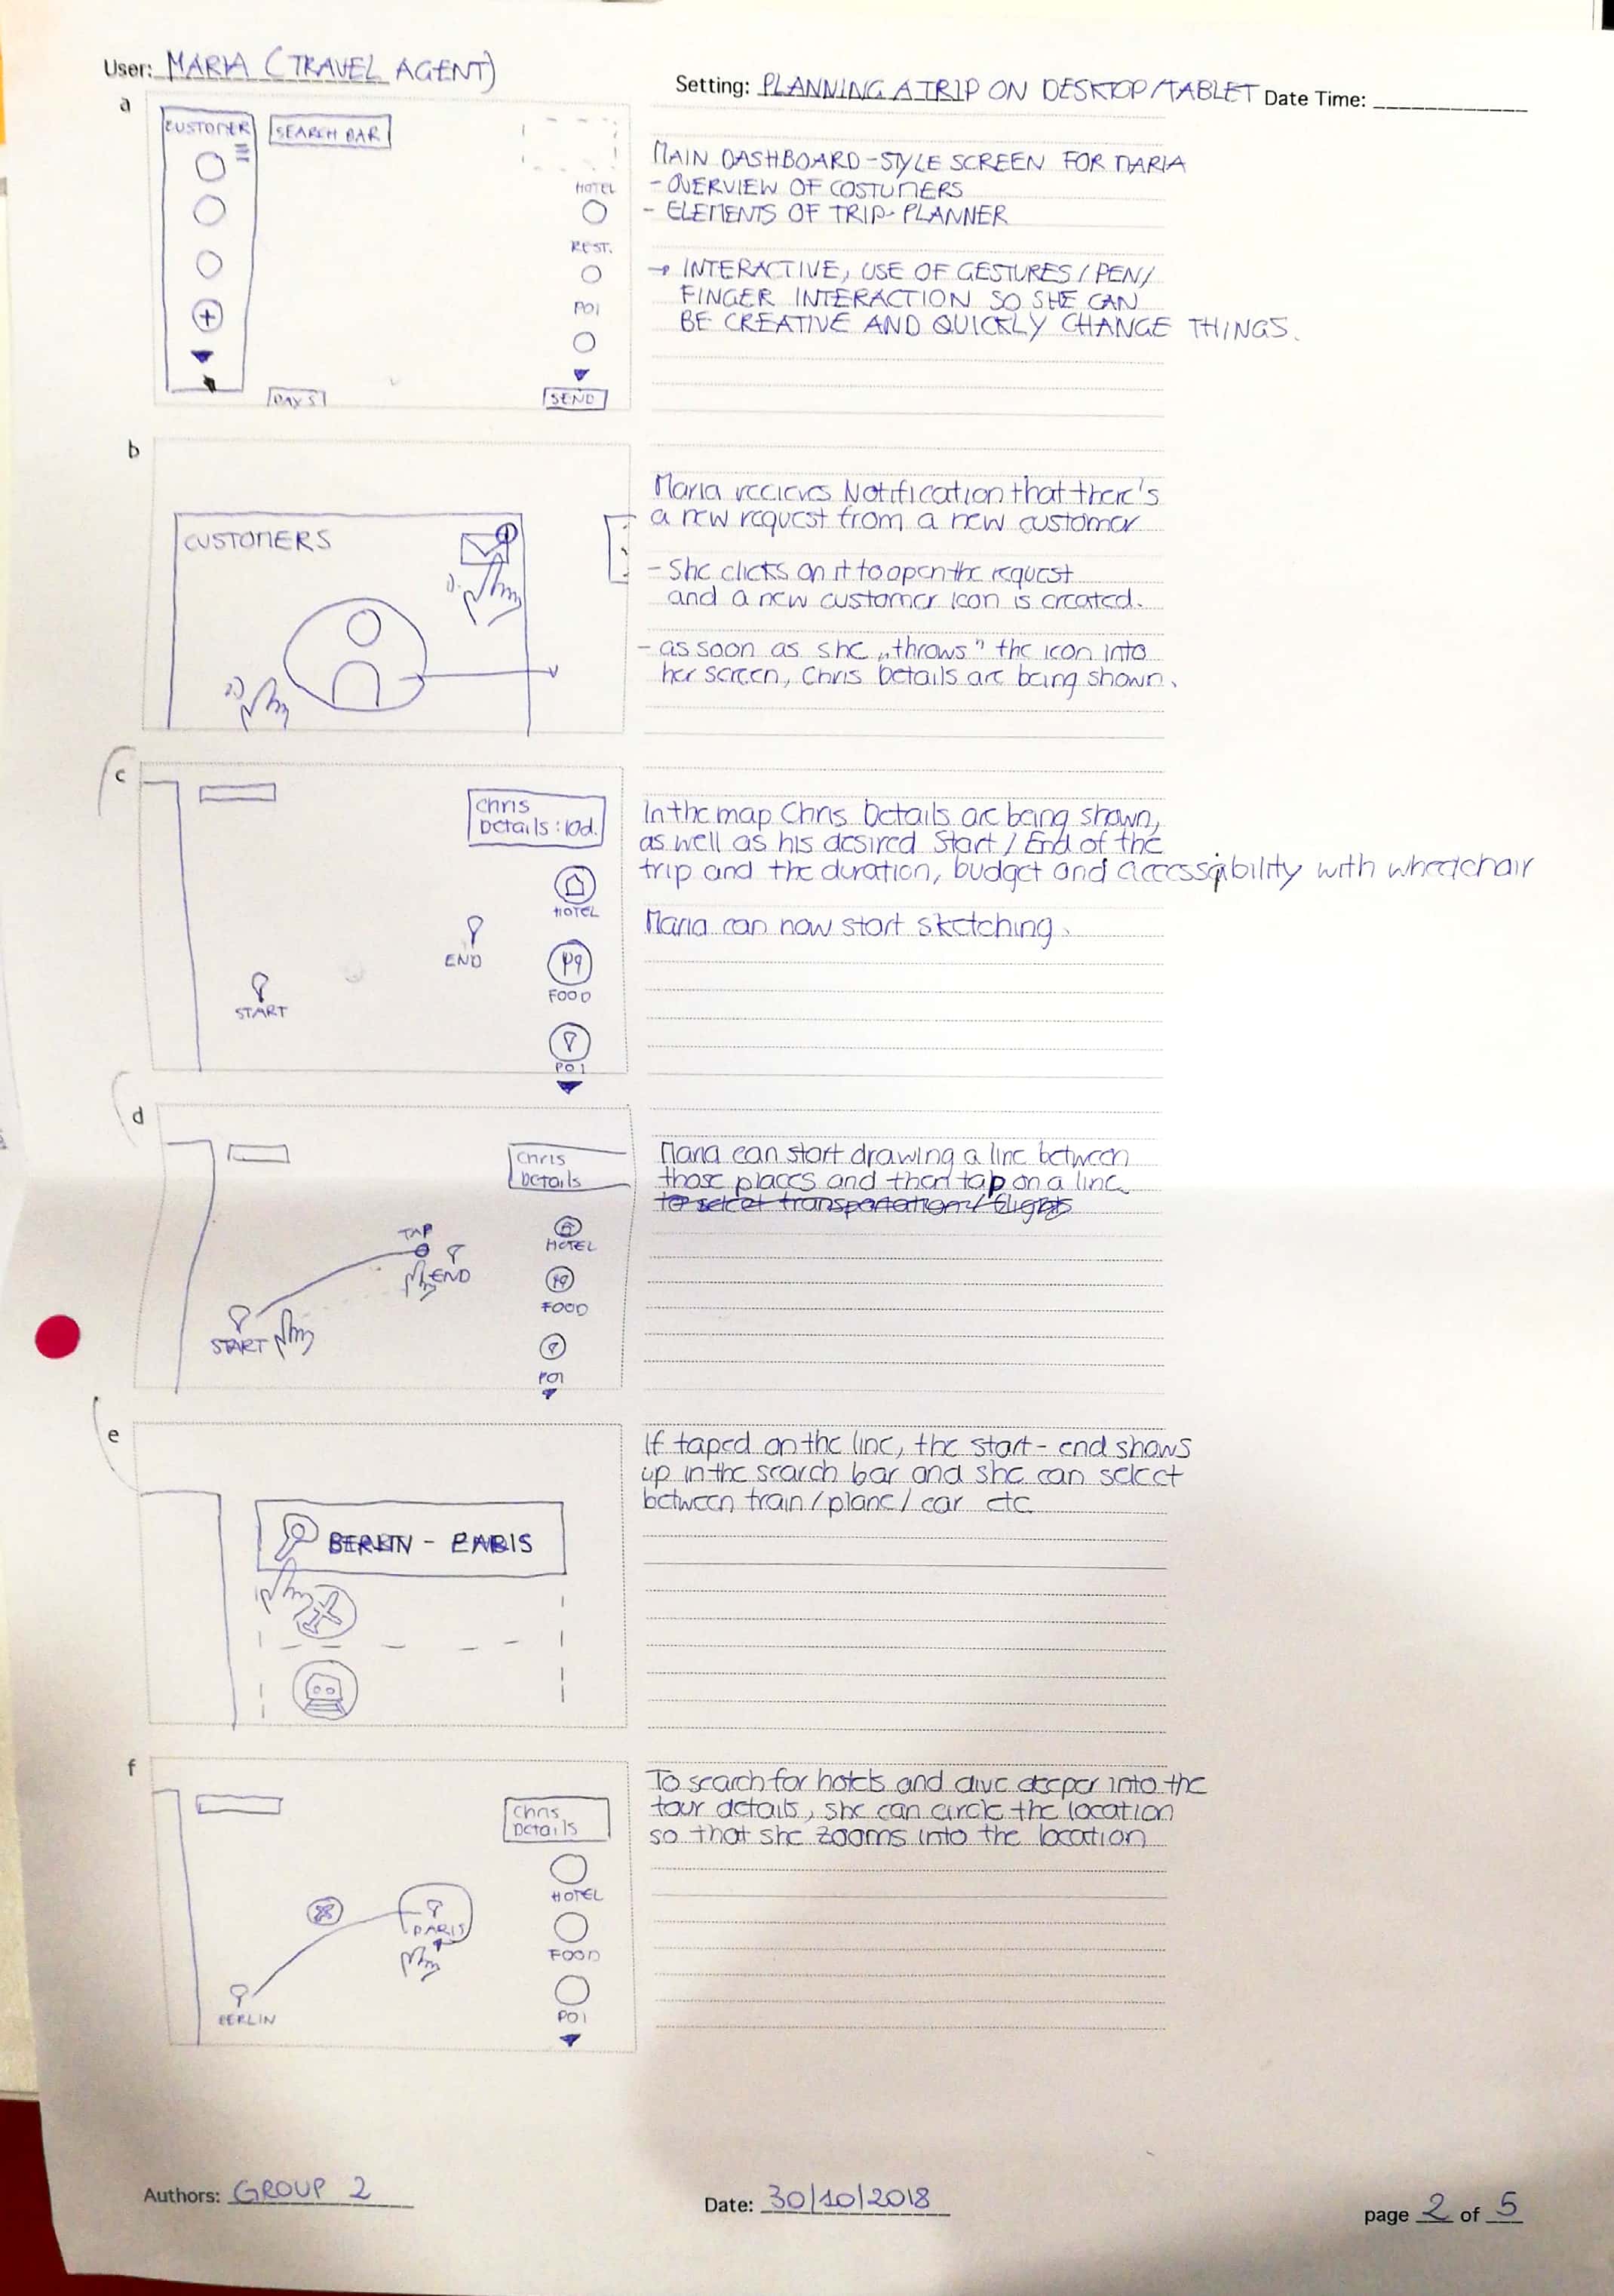
The column on the left shows what will appear in the video protototype. Begin with a titlecard with
the scenario title, system name, group members. The next intertitle card should introduce the three
personas. Divide the design scenario into a series of interaction points. Use an intertitle to describe
what is happening in the story, as in a silent movie. Follow it one to three sketches to illustrates the
user’s interaction with your new system. Discuss how to represent each interaction point, then
work in parallel to sketch them. If you do not agree, add interaction points that explore alternative approaches. Transfer key parts of the design scenario to the middle text area. Note camera angles and protyping instructions on the right.

Paper Prototype
Prototypes serve different purposes and thus take different forms. A series of quick sketches on paper can be considered a paper prototype and help the designer in different ways. They include paper sketches, illustrated storyboards, cardboard mock-ups, and videos. The most salient characteristics of paper prototypes is that they are created quickly, usually in the early stages of design and of low cost.

Advice
Get advices on how to prepare your prototype and how to choose the setting for your shoot.
More
Advice
To Do
- Go through your storyboard, for each interaction point think of which graphical units you will need and what you plan to do with it. Create artifacts for all of them.
- Create all your units. Make them reusable - e.g. draw one pop-up notification as a blank (e.g. draw two buttons and a frame on a sticky note as a blank pop=up). Now you can place all your messages written on other sticky notes into that blank when needed - if you need to reshoot just remove the message - or use the pop-up for any future notifications in your prototype.
- color code your units! E.g. green sticky notes for notifications, blue circles for buttons etc. that makes it easier to understand your design.
- Attach all these units to your storyboard, so that you will know beforehand which units you will need for the upcoming shots.
- Create your interface - think of how many version you will need for the shooting. Leave it as blank as possible and try to make all of the units interactive from the beginning - create as many graphical units as possible on seperate paper so you can interact with them.
- Having a backup of your units can help you to keep the shooting quickly. Any case, don't through away all the artifacts you are creating - store them somewhere, many things you will be able to reuse! Online you will find a lot of prototyping material, providing you templates for any kind of widgets, buttons, keyboards, etc. Of course you can use them, though it is recommended to create all of them yourself. Doing so, you won't be stuck in previous designs, as well as it will allow you to push the interactions further than clicking on buttons. Besides, no need for you to spend money and time to print and cut them out if you can just quickly sketch them yourself.
- For mobile or desktop devices, you can use a stencil of your device. Placing it on top, you can move anything below from left to right without the units falling out of your screen. If you have cartonage, you can even cut it out there and use these stencil devices over and over.
Checklist
Before starting off, check if you have all needed materials together.
More
Checklist
To Do
- Check and load batteries and memory space the day before.
- Build high tech ? Think low tech : don't look for digital tricks (time consuming) and play with simple things (paper, stickies, pens, adhesive and a bit of transparent are enough)
- Prepare, point and shoot, don't plan future post-production edits
- Use a tripod or any stable device to support your camera
- Use a room plenty of light, your device will then auto set to its highest resolution and the image will be crisp.
- Check the light will be constant : window light can be tricky if sun goes away from it
- Avoid noisy places and keep people away
- Install in a place with a large table so you can prepare units around your scene
- Avoid talking during scenes, except to help with script or to highlight interactions ("click")
- Avoid reflections, check reflexions with transparent film.